1968 Austin 1100 Mk1 (Take 2)
-
SiC
- It's S small i C
- Posts: 9352
- Joined: Sun Apr 28, 2019 8:59 am
- Has thanked: 1820 times
- Been thanked: 5360 times
Re: 1968 Austin 1100 Mk1 (Take 2)
Given the above and that it's restored up in rural Scotland near a farm, I wonder if it's painted in Ford Blue Tractor paint?
-
Eddie Honda
- Rainman The Google Fu Master
- Posts: 21483
- Joined: Tue Apr 09, 2019 10:45 pm
- Location: 寄居町
- Has thanked: 13358 times
- Been thanked: 13153 times
Re: 1968 Austin 1100 Mk1 (Take 2)
THEY HAVE NO SOAP IN COWDUNGBEATH
As we sing of the Blue Brazil.
There's no 'r' in place name.
As we sing of the Blue Brazil.
There's no 'r' in place name.
-
SiC
- It's S small i C
- Posts: 9352
- Joined: Sun Apr 28, 2019 8:59 am
- Has thanked: 1820 times
- Been thanked: 5360 times
Re: 1968 Austin 1100 Mk1 (Take 2)
Funny old name.
Interestingly the Engine Number in the Passport to service matches the engine in the car but the DVLA have it down differently.
Matching numbers car!
Interestingly the Engine Number in the Passport to service matches the engine in the car but the DVLA have it down differently.
Matching numbers car!
-
xtriple

- Paranoid Dog Parent
- Posts: 1956
- Joined: Fri Jul 26, 2019 3:26 pm
- Has thanked: 188 times
- Been thanked: 1568 times
Re: 1968 Austin 1100 Mk1 (Take 2)
I think that hinge needs a 'proper' repair sadly. It is in a 'high stress' area and will continue to weaken. If it's just fillered, then the filler will crack as well. I would think with an able body and the skills required it's a do at home repair without too much effort.
Bonnet off should give clearance?
Bonnet off should give clearance?
-
SiC
- It's S small i C
- Posts: 9352
- Joined: Sun Apr 28, 2019 8:59 am
- Has thanked: 1820 times
- Been thanked: 5360 times
Re: 1968 Austin 1100 Mk1 (Take 2)
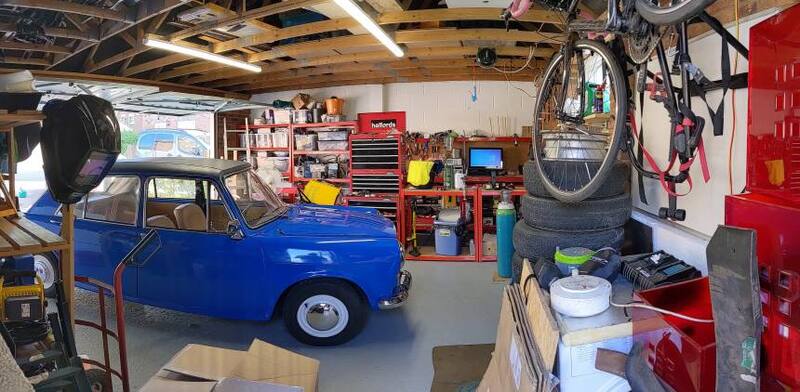
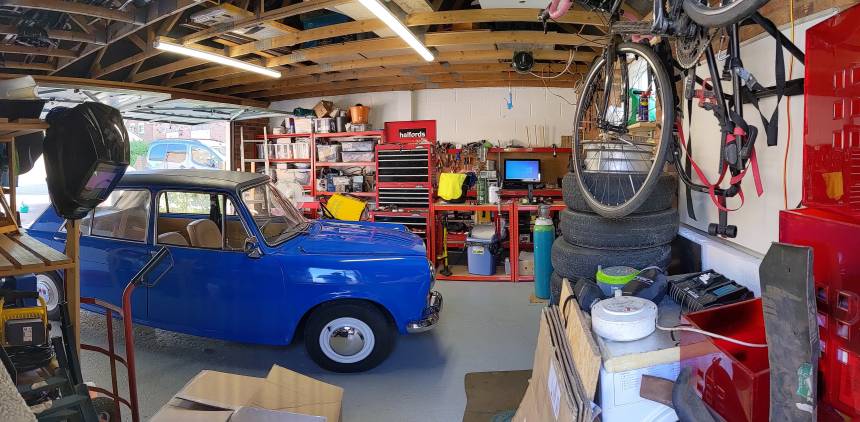
Gave it a good clean today. Do like to have it clean before I put it in the garage.

Went to start it up but the fuel pump kept clicking. Checked the fuel bowl and nothing was getting through. Either got a leak and/or used up the last bit the other day.

Float bowl is full of crud at the bottom.

Also a set of seat belts arrived. The ones on the car are Kangoo fixed jobbies but I much prefer retracting belts. I chose Beige coloured to match the interior, but to be honest they're more gold.

Popped it into the garage.
Then rigged up a professional* grade fume extractor and ran the engine up to temperature.

Dropped the oil. Magnetic plug wasn't too bad.

Then removed the filter. Naturally this always happens despite my best efforts.

At least it'll stop the floor going rusty.
Noticed that the filter housing is missing its plate. This is not good as without it, the oil flows around the filter rather than thru it. Thus effectively leaving the filter completely bypassed. I'll have to try and find the correct plate - hopefully Moss will stock it.

Then I jacked it up to have a good look under today. Front hard pipes look copper, rear are steel and crusty. Might get a set of hard and flexi pipes from Longbridge MS.
Rest doesn't look too bad so far to be honest.
Rear subframe is a bit crusty and had repairs previously but feels solid. Rear subframe mount areas looks in excellent condition. Front look like they've been welded and a decent job. Could do with a bit of extra paint just to give them a longer life.
Fuel tank needs some protection to make it last longer. Fuel pipe at the rear is starting to go crusty but I'm hoping some Kurst and paint will prolong that. Flexi hoses to pump are in need of attention though as they look original. Modern ethanol fuel will likely finish them off quickly.
Interconnecting Hydrolastic pipes both have pipe + clamps on. I wonder if someone cut them at the front to make it easier for their removal during restoration.
Gave the front hubs a good wiggle and there is a little bit of movement which I'm expecting to be normal due to end float on the front bearings. Ball joint covers look intact and there is grease about which always is a good sign.
Cooling system is definitely in need of some love. Pipe that connects to the expansion container has some comedy pin holes in it. Interesting to note that the radiator cap is of a pressure release type. I was expecting a blank cap with the expansion tank being the one with the pressure cap on.
Hoses to the cabin heater are well past their best. Also the heater valve is weeping.
Engine runs pretty well now. Still needs a good tune up and of course that filter sorting. Now I've discovered it, I'm not going to run the engine until the necessary bits are back in that filter. Hopefully no damage has been done to the engine bearings.
[YouTube][/YouTube]
Need to get some part orders in tomorrow first thing. A few bits like hoses and engine parts I should be able to get from Moss tomorrow. Hoping they'll have the filter plate in. Also going to get those hard and flexi brake ordered from Longbridge Motor Spares. I don't like to risk anything on braking systems. If I don't have a receipt to see when flexis have been done, I like to change them anyway as a precaution.
-
SiC
- It's S small i C
- Posts: 9352
- Joined: Sun Apr 28, 2019 8:59 am
- Has thanked: 1820 times
- Been thanked: 5360 times
Re: 1968 Austin 1100 Mk1 (Take 2)
Trying to get the rear drums off is proving a bit of a struggle. I'm trying the Haynes method of using the flat disc from the spare tyre and bolting the wheel back on. I've done them up as much as I can without risking buckling the wheel but no budging.

Any suggestions?
(Wheel studs are part of the drum assembly on the ADO16. Stupid design.)

Any suggestions?
(Wheel studs are part of the drum assembly on the ADO16. Stupid design.)
-
Eddie Honda
- Rainman The Google Fu Master
- Posts: 21483
- Joined: Tue Apr 09, 2019 10:45 pm
- Location: 寄居町
- Has thanked: 13358 times
- Been thanked: 13153 times
Re: 1968 Austin 1100 Mk1 (Take 2)
Stop! Hammer Time!
(Is it just stuck on a taper? A percussive persuader should sort that.)
Failing that the VL Churchill 18G304 puller with the two hollow bolts would have that off in no time.
(Is it just stuck on a taper? A percussive persuader should sort that.)
Failing that the VL Churchill 18G304 puller with the two hollow bolts would have that off in no time.
-
The Reverend Bluejeans
- Prize Cunt
- Posts: 6314
- Joined: Wed Apr 10, 2019 6:31 pm
- Location: Big Al Granvia’s armpit.
- Has thanked: 718 times
- Been thanked: 2334 times
Re: 1968 Austin 1100 Mk1 (Take 2)
The restorer was a fucking idiot because:
-Connaught green is a lovely colour.
-That blue is fucking horrible.
-You have to award extra cunt points for cutting the hydro pipes and joining them with such a spectacular bodge. Yes, that's totally safe m8. Particularly when you hit a fucking great pothole and it blows, losing suspension on one side.. It needs new pipes now. What an abysmal lash up. Someone should be prosecuted for that.
-
SiC
- It's S small i C
- Posts: 9352
- Joined: Sun Apr 28, 2019 8:59 am
- Has thanked: 1820 times
- Been thanked: 5360 times
Re: 1968 Austin 1100 Mk1 (Take 2)
Don't worry, Dr Moulton had sudden catastrophic failure covered.The Reverend Bluejeans wrote: -You have to award extra cunt points for cutting the hydro pipes and joining them with such a spectacular bodge. Yes, that's totally safe m8. Particularly when you hit a fucking great pothole and it blows, losing suspension on one side.. It needs new pipes now. What an abysmal lash up. Someone should be prosecuted for that.
From "The Story of the BMC 1100", in a section dedicated to Dr Moulton and his article that was published in 1962:

-
Eddie Honda
- Rainman The Google Fu Master
- Posts: 21483
- Joined: Tue Apr 09, 2019 10:45 pm
- Location: 寄居町
- Has thanked: 13358 times
- Been thanked: 13153 times
